| |
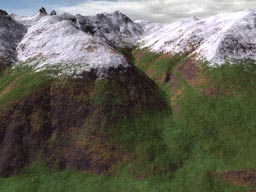
The last rendering looks pretty interesting although both layers are only using default parameters. Now it's time to start adjusting parameters. But before that, let's quickly talk about how to use preview.
Adding more layers will cause rendering time to increase, so you are encouraged to use preview window while testing.
|
| |
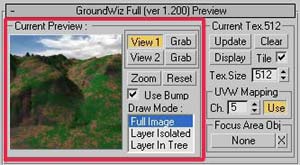
Preview window has many useful features to make working with layers as easy as possible and detailed description is beyond the scope of this tutorial. For a quick start, open GroundWiz preview panel and click on the first button named 'Grab'.
It will take a couple of seconds or so and preview image will be updated with an image of a current view. Click on the button named 'Zoom' and a window will open that displays a bigger preview image. Use mouse wheel to zoom in closer and see more detail. In preview mode, you will be able to observe all changes quickly without delay.
|
| |
It's time to start adjusting layers. Each layer has numerous adjustable parameters that can be divided into 2 basic groups: basic parameters found under panel 'GW Layer Data' and layer placement (distribution) parameters that are under panel 'GW Layer Distribution'. Adjusting these parameters requires some trial and error testing but with preview window, it should be much easier.
In case of this tutorial scene, there are 3 important ground layers: rock, grass and snow.
1. Rock as the bottom most layer should be adjusted first. Change its color to: R84 G64 B66. Set StrechUp parameter to 10.0, which will make rock layer look stretched on steep cliffs. This especially affects rock's bump, which will be more talked about in the next tutorial.
2. Next we modify layer 'Ground 01' that is going to be our grass layer. You should start with changing its name to 'Grass' for your convenience. Set color to more subtle green: R66, G80, B40.
3. It's time to check out the distribution control. To make grass cover more surface, use 2 sliders under 'Distribution Properties' group: Amount and Noise. Set Amount to 93.0 and Noise to 8.0. Grass should be limited not to grow either on top of the hill or on too steep hill, so we enable 2 distribution limits:
a. Use 'Altitude Limits' and enable Max checkbox. Set height to 890.0 and transition height to 75.0. These are meters (the current scene uses meters as System Units). You are free to use feet, inches, or generic units later in your scenes but try to keep real life dimensions for best results.
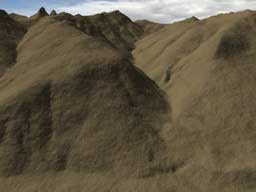
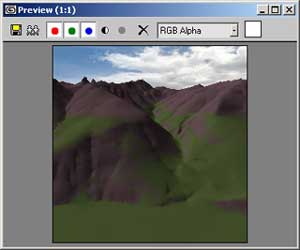
b. Enable 'Slope Limits' Max checkbox: set angle to 34.0 degrees and transition height to 10.0. Preview should look like the following picture:
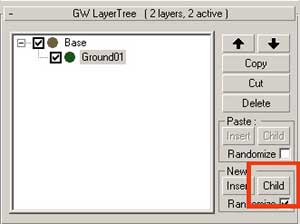
4. To add a snow layer, first we create a new layer. Select the base layer in Layer Tree panel and click new child. We want this layer to cover both 'Base' and 'Grass' layers, so click MoveDown to move the new layer to the bottom of the list. Snow should cover only tops and not too steep surfaces. The setup procedure is pretty much the same as the 'Grass' layer. So to make the long story short, here are settings for the snow layer:
Name: Snow
Color: R228 G223 B234
Distribution Amount: 95.0%
Distribution Noise: 20.0%
Altitude Limits Min: enable checkbox, Min: 850.0, Transition height: 220.0
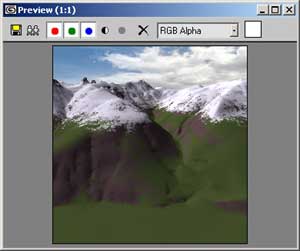
Slope Limits Max: enable checkbox, Min: 53.0, Transition angle: 20.0
And a snapshot of the preview window:
5. At this stage there are 3 layers used : rock, grass and snow. We add 2 more layers to make things a bit more colorful. Just above layer 'Grass', we should add soil layer:
Name: Soil
Color: R148 G102 B60
Distribution Amount: 58.0%
Distribution Noise: 14.0%
Slope Limits Max: enable checkbox, Max: 45.0, Transition angle: 10.0
6. Since grass is covering most of hills, we add another brighter grass layer to make it look livelier. The new grass layer should be a child layer of the current grass layer so that it shows only where the current 'Grass' layer already appears.
Name: FreshGrass
Color: R70 G102 B55
Distribution Amount: 36.0%
Distribution Noise: 18.0%
Altitude Limits Max: enable checkbox, Max: 875.0, Transition height: 190.0

|
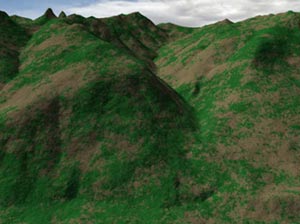
Here is the final rendered image:
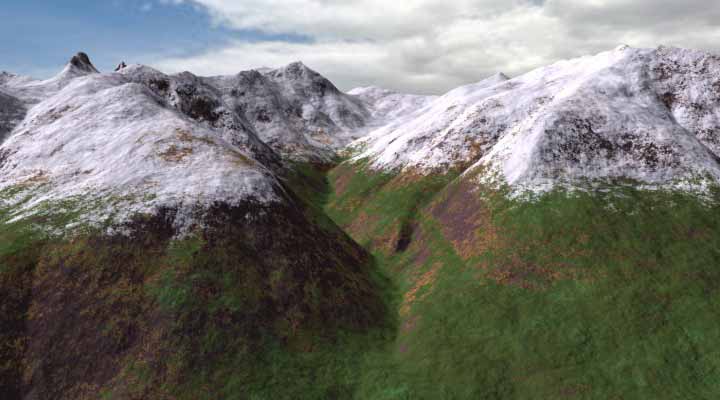
Your image will probably look a bit different. Exact positioning of layers is controlled by 2 random parameters: Layer Random and Bump Random. To change random position of each layer, press Randomize (check the preview) a couple of times.
If you'd like to exactly match the image in this tutorial, you will have to copy random values of both Layer Random and Bump Random for each layer, from GroundWiz in Material Editor slot1.
|